SC207 ~ Pirouette Dreams ~
December 17th, 2008 by Holly McMillen
 Good Morning?!
Yup, if you are reading this now… it is 2:23am. Where are all my insomniac friends?
So here is how it went down. I was waiting up to pick my Zeke up from work at midnight, when I started blog hopping and looking at different bags/boxes/etc. I started making a few and pretty soon I was frustrated with copying other people’s work, so I designed my own bag/box (shown in pic above).
Now, I know you all are going to want details and dimensions and we’ll get to that in a bit, but first… I uploaded the bag/box to SCS and called it a night. Before I signed off, I took a peek to see if the SC had been posted and sure enough it had! That did me in. I was already thinking I needed a card to go with my box, so I dragged myself back to the studio (or corner of the livingroom as I lovingly call it), and made a matching card for my box :).
I am totally diggin’ the layout of today’s SC. I think it is very versatile and I will likely make another, but lemme get through this night, Lord, let me get through this night!
Ok, so you want deets. The little acetate bag/box measures 2 1/2 ” wide by 1 1/2 ” deep by 5″ high. I really really intend to do a tutorial on this soon, but in the meantime, I am going to give you basic instructions…. let’s see if you can follow :).
Step 1: Cut a piece of cardstock (I used GP white) measuring 4 1/2 x 3 1/2 inches. Score on all four sides at 1 inch. Cut as shown in diagram below:
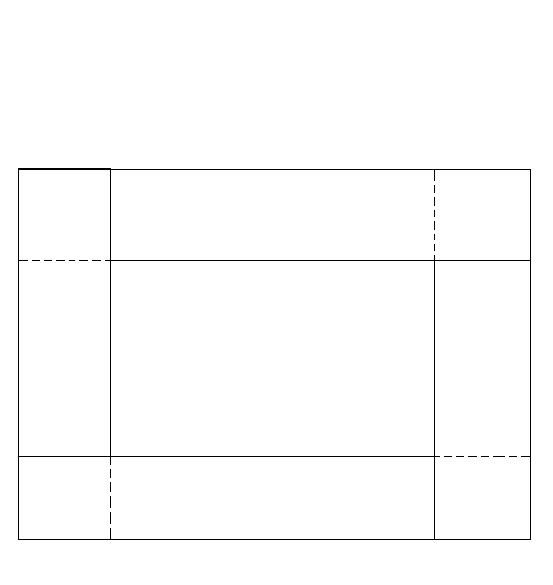 You are going to cut on the dotted lines and fold all sides to form a box bottom. Use sticky tape to adhere the tabs as you want it to be able to hold weight.
Step 2: Cut a piece of acetate 8 1/2 inches x 5 inches. On the long side, score at 2 1/2 inches, 4 inches, 6 1/2 inches and 8 inches. You will have a little 1/2 inch tab left over. Crease on your score lines using a bone folder or the edge of a ruler to make crisp corners. Apply a 1/4″ wide piece of sticky tape along the little tab on your acetate piece. Adhere the ends of the acetate to form a rectagular tube. This will fit inside the box bottom you made in step 1.
Step 3: Apply sticky tape along the bottom of your acetate piece on all four sides. Slide it into your box (I squeeze it together while I am putting it in so that it doesn’t stick before I want it to)…. and press against all sides. I use a ruler to straighten the sides by running it along the inside of the box sides.
Step 4: Cut a 9″ x 2 1/2 ” piece of decorative paper and adhere it around the bottom of the box like a skirt, using sticky tape as you go long. Overlap in back.
Step 5: Use a punch (like the designer label I have used) to create the ‘handle’ by punching through the top of your acetate.
Now you’re ready to fill and decorate!
Here is the box alone:

Here are the supplies used:
Stamps: Dreams du Jour (SU!)
Colors: Pink Pirouette, GP White, Kiwi Kiss, Bella Rose dp and acetate (or transperancy)
Ink: Brilliance Graphite Black, copics
Accessories; ribbon, scissors, 1/2 pearls, designer label punch, scoring blade, goodies!, MS butterfly punch (card), sticky tape, dimensionals.
Ok, I am about to hit the enter key and head for bed?
If you have any questions about the bag/box or need pictures, please give me a holler!
*********************************************************************
~My Friend Ensemble~
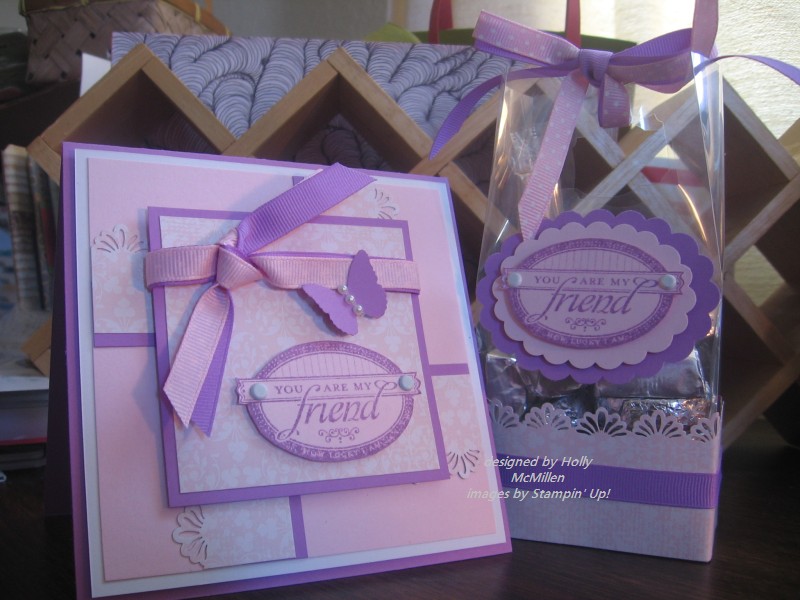 I had to sneak this in. My son, Levi, was so impressed with my Pirouette Dreams ensemble that he asked me to make a set for his young friend at school who is turning 14 on Friday. He wanted me to make the bag/box a little bigger, but he wanted the card to look like the Dreams card. His only requirement was that it had to have some purple on it :).
How does a mom refuse that?! 🙂
TFL!~ and have a blessed day!!


I love your box just the right size for some candy. TFS
I love this! So pretty!
Just love what you did with the sketch challenge, Holly. The MS border punch softens it so nicely and the butterfly is a perfect touch.
The little acetate box is great! Going to have to try this as I just got some acetate after seeing so many wonderful things made with it on SCS. the two match wonderfully and will be enjoyed by the recipient, I’m sure.
Sorry to hear you were up late again. Hope you can get some sleep today so you feel a bit better. I on the other hand, have to go shovel the driveway as we actually got some snow here and based on the colder temps and long range forecase, we just may get a white Christmas – yipee!!
[…] […]
Thanks for posting the directions. I don’t even think you need more, to me, that is a tutorial!